Showing posts with label monday made it. Show all posts

Monday, August 11, 2014

Monday Made-It {8.11.2014}

We start school relatively late in my district, but I've been seeing everyone's back to school posts and it really had me inspired this week so I have been crafting and creating like crazy!

I got this idea from Shanyn at Coffee, Kids and Compulsive lists {here}! I loved it because it's SO simple... one of those ideas where you wonder- why didn't I think of that?!
All of my popsicle sticks got a washi tape makeover! I got blue and green chevron washi tape at Michael's and wrapped the tops of the sticks. These are the sticks that go in a jar that I pull to pick names. If you notice in the top right picture, make your "seams" on one side so that you can write the students' names on the neater side.

But I didn't just make these because they were cute, there's a reason!
Step 1: All the names in a jar, washi tape up.
Step 2: Pull out a name.
Step 3: Put the name stick back in the jar, washi tape DOWN.
Step 4: NOW I know which names I've called and which names I haven't because I can tell which side the washi tape is on. Brilliant!
Since I got a whole set of popsicle sticks and washi tape, I continued using them to finally make an idea I've had for a while!

Team Name Generator!!!
I always, always, always have my students pick their team names whenever we're playing some sort of game in my class (and we play a lot of games). It makes them excited about the activity and gives them ownership of their group. HOWEVER, sometimes it takes a long time and a lot of the time it leads to bickering between students about what the team name should be.

Enter... team name generator.

I put one washi tape (blue chevron) on half the popsicle sticks and another color (green chevron) on the other half of my popsicle sticks. On the green popsicle sticks I wrote a bunch of adjectives (sparkly, angry, courageous, polka-dotted, purple, funky...) and on the blue I wrote nouns (penguins, unicorns, tigers, bears, eagles...)

Have each team pick one blue and one green popsicle stick and....
They've got their name! In this case, it was the cheerful sharks, ha!

I thought this could be fun, but it also reinforces adjectives and nouns. I'll be saying "Ok, pick an adjective...now a noun..." all year.

I also made a calendar display for my chevron-themed classroom this year:

It includes the months, days of the week and days 1-31 for you to display in your classroom. I had a calendar that I bought from a teaching store, but I lost the "31" number so then it looked ridiculous with my homemade non-matching 31 so I put this set together. Now if I lose a number, I can just reprint.

You can have this set too if you'd like! Hop on over to my TPT store.
You can also purchase all of my chevron-themed classroom sets in a brand-new bundle {here}.
Aside from chevron, I'm also obsessed with anchors and anything nautical. So, I also made a set of nautical binder covers! The set includes fifteen binder covers for all of your back-to-school organizational needs. Every year I say I'm going to be more organized so this was step ONE!


Monday, July 14, 2014

Monday Made It: Pinterest Covers

Today is Monday Made It! My last Monday Made-It was when I made my teacher toolbox that I blogged about {here}

A couple weeks ago Ladybug Teacher Files blogged about customizing your covers on Pinterest. She had each step written out so easily so I decided to give it a try. You can find the blog entry {here}!!! 

Following her directions made it SO easy. I have a lot of boards, though, so it took some time to create and post the new covers just because of quantity. 

The best part is that Kristen from Ladybug Teacher Files explains how to link your pinterest cover image to your pinterest boards so that when people repin the images, when they click it redirects them to your pinterest and hopefully gets you more followers!


(I made the covers in Powerpoint with KG fonts.)

1. Make a rectangle in Powerpoint (by clicking shapes). Don't worry about it being perfect, you're going to resize it in the next step.

2. Right click your rectangle and format the picture to be a height of 2.04 inches and a width of 3.01 inches. 

3. Once you're happy with your image, select all the pieces (textbox, background, any clip art/graphics) and right click. Go to 'save as picture' on the drop down menu.

4. Go to your pinterest board that you want to add your image to. The first box (if you're logged in) within the specific board will say "Add a pin." Click that button and then click "Add a Pin from your computer." You can upload the image!


5. Go back to the "Your Profile and Pins" page and roll your mouse over the board to change the cover to the image you just uploaded. You're good to go!

6. You can go back and edit each cover (by opening the pin and then clicking the pencil option that says "Edit") to put in the url of your pinterest board so that it links back.
Copy the url of the board you want to link from here: 


Here's how to link the image back to your board, click edit, then paste the url:

And there you have it! Come see my pinterest here! I have almost 50 boards and it's exclusively teaching-related.


Monday, December 10, 2012

December Monday Made-It + Freebie + New Product!!


So I've been busy adding some science products to my store. Anyone else feel like science gets a little neglected??


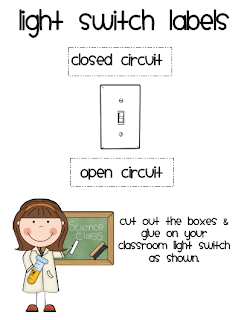
Ok so this is what I made for my December Monday-Made-It! It's available for you to add to your own classroom, too. Just hop over to my TPT store to download.


It's simply light switch labels for open and closed circuits. We haven't started learning about them just yet, but I figure the earlier they're exposed to the vocabulary, the better. Especially since I think open and closed circuits are a bit confusing for my fourthies.

If you teach about circuits and electricity, head on over to my TPT store to grab this freebie!

The second thing I added yesterday is another set of quick checks. These "Quick Checks" are for science. They're aligned with the common core curriculum and Virginia's Standards of Learning for fourth grade science. 

I posted about the Math and Social Studies Quick Checks here and here.


How many days does everyone have left until winter break? Our last day is the 21st!


Monday, August 27, 2012

Monday Made It #1


This is my first Monday Made It! I have been loving this blog series, thanks to Tara at 4th Grade Frolics. I am just so inspired by everyone's DIY projects.

This past week, I went to the dollar store and grabbed three "document" frames, which were standard paper size 8 1/2 x 11 in.

I spray painted the frames this cute lime green color to go with the rest of my pink/green room. Since the frames were a weird cheap wood, the spray paint didn't take perfectly the first time, but it looked kind of rustic and intentional, so I never did a second coat.

My fiance says I spray paint wrong because I'm just having a spray party getting spray paint all over. But that doesn't matter because I had fun and they turned out great IMO :)

Then I just hot glued some ribbon onto the top of the frames so that I could hang them off of some command hooks on my wall.

Here's how they turned out!